>/posts/DUCTF2024 I see $
Estimated reading time: 11 minutes

I See
Category: hardware
Difficulty: easy
Author: HexF
Tags:
I too see the kiwi and the emu over there!
We suggest you solve this challenge before attempting any others.
Handout files
First Part
Figure out what the real task of the challenge is.
The Hardware Part
Based on the given schematic, we have an RPI2040 controller connected to another mysterious chip via the I2C bus. After a quick search on Google to find out what the M24C02-WMN is, I discovered it’s an EEPROM memory. Therefore, I assumed that the main task is, of course, to read its memory.
OK, so what to do with that information?
Well, usually you'd need to compile the code on your board, test it, and then send it as the challenge answer. But unfortunately, I don't have an RPI2040 in my collection, so I hope it will run right away.
The envirnoment
In my case, I used Arduino IDE which by default cannot compile programs for that kind of board, but don't worry. Here is the link to the GitHub repository containing the port for the Arduino ecosystem. You can find the installation guide there as well, so I won't talk more about it.
Pogramming.c
#include <Wire.h> //include I2C lib

const int eepromAddress = 0x50; // Set I2C Address 50 HEX (default).
const int sdaPin = 4;
const int sclPin = 5;

void setup() {
Serial1.begin(115200); //Initializa UART 115200 Baud was described at task website.
 while (!Serial1) {
 ; //Wait for seiral
 }
 Serial1.println("EEPROM Reader");
 Wire.setSDA(sdaPin); //Initialize I2C Bus
 Wire.setSCL(sclPin);
 Wire.begin();
}

void loop() {
 Serial1.println("Reading EEPROM...");
 for (int i = 0; i < 256; i++) { //Read whole memory
 byte value = readEEPROM(i);
 Serial1.print("Address 0x");
 Serial1.print(i, HEX);
 Serial1.print(": 0x");
 Serial1.println(value, HEX); //println adds newline at the end.
 }
 delay(5000); //Delay in looop
}

byte readEEPROM(int address) {
 byte rdata = 0xFF;
 Wire.beginTransmission(eepromAddress);
 Wire.write(address);
 Wire.endTransmission(false);
 Wire.requestFrom(eepromAddress, 1);
 if (Wire.available()) {
 rdata = Wire.read();
 }
 return rdata;
}
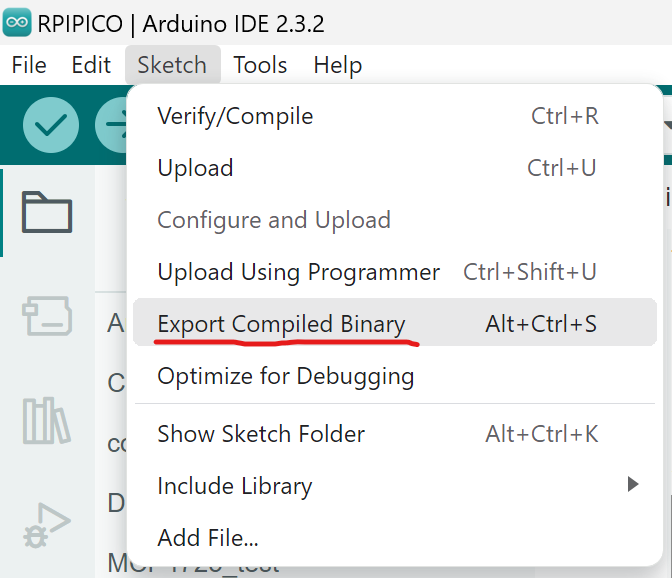
When your code is ready, use selected option:

Now go to the project directory, find your compiled file YourProjectname.ino.elf and upload it on the website.

The output
"Reading EEPROM...
 Address 0x0: 0xFF
 Address 0x1: 0xFF
 Address 0x2: 0xFF
 Address 0x3: 0xFF
 Address 0x4: 0xFF
 Address 0x5: 0xFF
 ..."
The whole 256 addresses looked like this: 0xff means a reading error.
Take step back
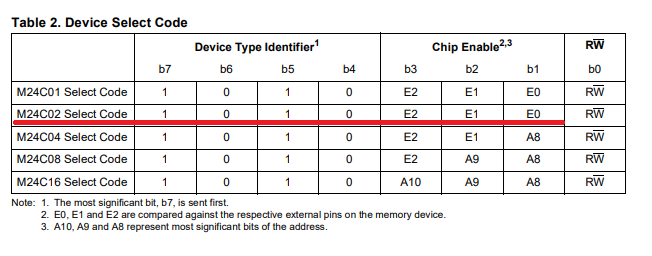
I looked again at the schematic and datasheet. Here’s what I’ve found: Pins E0, E1, and E2 are connected to the 3.3V bus, which makes them be in the HIGH state (logical 1).

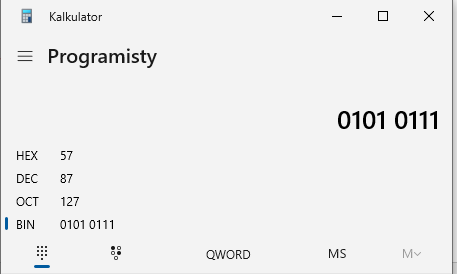
And according to the documentation, the I2C address is no longer 0x50 (as default).

So I needed to change the address in the second line of code to 0x57.
And here is the output of the program:
Address 0x0: 0x63
Address 0x1: 0x6C
Address 0x2: 0x75
Address 0x3: 0x73
Address 0x4: 0x74
Address 0x5: 0x65
Address 0x6: 0x72
Address 0x7: 0x46
...
Next step is to extract raw bytes without adresses. To be honest I used Notepad++ to extract hex values, but here is more elegant solution for this:
You have to edit for loop
Here's the updated version of the loop printing memory values:
  for (int i = 0; i < 256; i++) {
    byte value = readEEPROM(i);
    Serial1.print(value, HEX);
  }
  Serial.println("");

0x63 0x6C 0x75 0x73 0x74 0x65 0x72 0x46 0x55 0x51 0x20 0x28 0x63 0x6C 0x75 0x73 0x74 0x65 0x72 0x65 0x64 0x20 0x66 0x69 0x72 0x6D 0x77 0x61 0x72 0x65 0x20 0x75 0x70 0x64 0x61 0x74 0x65 0x20 0x71 0x75 0x65 0x75 0x65 0x29 0x2C 0x20 0x74 0x68 0x65 0x20 0x44 0x6F 0x77 0x6E 0x55 0x6E 0x64 0x65 0x72 0x43 0x54 0x46 0x20 0x68 0x61 0x72 0x64 0x77 0x61 0x72 0x65 0x20 0x69 0x6E 0x66 0x72 0x61 0x73 0x74 0x72 0x75 0x63 0x74 0x75 0x72 0x65 0x20 0x72 0x61 0x6E 0x20 0x79 0x6F 0x75 0x72 0x20 0x63 0x6F 0x64 0x65 0x20 0x6F 0x6E 0x20 0x72 0x65 0x61 0x6C 0x20 0x68 0x61 0x72 0x64 0x77 0x61 0x72 0x65 0x21 0xA 0x57 0x65 0x20 0x68 0x6F 0x70 0x65 0x20 0x79 0x6F 0x75 0x20 0x65 0x6E 0x6A 0x6F 0x79 0x20 0x74 0x68 0x65 0x73 0x65 0x20 0x63 0x68 0x61 0x6C 0x6C 0x65 0x6E 0x67 0x65 0x73 0x2C 0x20 0x74 0x68 0x65 0x79 0x20 0x77 0x65 0x72 0x65 0x20 0x71 0x75 0x69 0x74 0x65 0x20 0x66 0x75 0x6E 0x20 0x74 0x6F 0x20 0x6D 0x61 0x6B 0x65 0x21 0xA 0xA 0x41 0x6E 0x79 0x77 0x61 0x79 0x73 0x2C 0x20 0x68 0x65 0x72 0x65 0x20 0x69 0x73 0x20 0x79 0x6F 0x75 0x72 0x20 0x66 0x6C 0x61 0x67 0x3A 0x20 0x44 0x55 0x43 0x54 0x46 0x7B 0x49 0x32 0x43 0x5F 0x74 0x68 0x65 0x5F 0x66 0x6C 0x61 0x67 0x5F 0x6E 0x6F 0x77 0x5F 0x66 0x63 0x65 0x65 0x32 0x61 0x63 0x66 0x7D
Decoding
Now you can use CyberChef or any other tool to decode ASCII from Hex. Or even write some fancy scripts to read this. I did mine in Ruby.
input_string = "0x..."
hex_values = input_string.split.map { |hex| hex.delete_prefix("0x").to_i(16) }
ascii_string = hex_values.pack("C*")
puts ascii_string
Answer
And there you are, here is your prize:
clusterFUQ (clustered firmware update queued), the DownUnderCTF hardware infrastructure ran your code on real hardware!
We hope you enjoy these challenges, they were quite fun to make!

Anyways, here is your flag: DUCTF{I2C_the_flag_now_fcee2acf}
X
Comments (0)
Please log in to add a comment.