>/posts/KPMG2024 Mobile App Reverse $
Estimated reading time: 38 minutes

Mobile App
Category: Reverse
Difficulty: Medium
Author: KPMG
Tags: reverse, mobile, XOR
Can you find the hidden flags in the mobile app?
Handout files
First Part
Well, since the description was rather brief, we can't learn much from it.
Therefore, it's a good practice to start examining the application by running the command:
strings program.ext
in Linux to see what ASCII strings are stored in the application. On Windows, there are desktop applications for performing a similar search. I used the Binary Ninja application. The result is shown in the screenshot below:

A flag!?
Heh, here’s our first flag, even before running the application, but its text says this is just the beginning:
KPMG{Level_1_fl@g_ther3_r_moor_to_find!}
So, time to run the application
To do this, I used the Blue Stacks application, into which I imported the app.

After launching, the application doesn’t offer much. Inside, there is a simple text input that returns information on whether the entered flag is correct or not. Before returning to Windows, it's a good idea to check the functionality of the form itself.

Decompilation
The next step is to use a decompiler to read the application's code. I used JD Gui. In the program, I searched for the string "Error" to locate the function handling the form.

If you'd like to study the code of this function, I’ve posted it below:
package com.example.hckademy;

import android.os.Bundle;
import android.util.Log;
import android.view.View;
import android.widget.EditText;
import android.widget.Toast;
import d.e;
import java.security.MessageDigest;
import java.security.NoSuchAlgorithmException;
import java.util.Objects;
import java.util.function.IntFunction;
import java.util.stream.Collectors;
import java.util.stream.IntStream;
import x0.a;

public class MainActivity extends e {
  public static final int o = 0;

  static {
    System.loadLibrary("c.");
  }

  public native boolean check2(String paramString, byte[] paramArrayOfbyte);

  public void onCheck(View paramView) {
    String str1 = ((EditText)findViewById(2131230909)).getText().toString();
    StringBuilder stringBuilder2 = new StringBuilder();
    stringBuilder2.append("onCheck: ");
    stringBuilder2.append(str1);
    Log.d("H@ckademy - MainActivity", stringBuilder2.toString());
    byte[] arrayOfByte2 = str1.getBytes();
    byte[] arrayOfByte1 = getString(2131689472).getBytes();
    for (byte b = 0; b < arrayOfByte2.length; b++)
      arrayOfByte2[arrayOfByte2.length - b - 1] = (byte)(arrayOfByte2[arrayOfByte2.length - b - 1] ^ arrayOfByte1[b % arrayOfByte1.length]);
    String str2 = IntStream.range(0, arrayOfByte2.length).<CharSequence>mapToObj((IntFunction<? extends CharSequence>)new a(arrayOfByte2)).collect(Collectors.joining());
    StringBuilder stringBuilder1 = new StringBuilder();
    stringBuilder1.append("check1: ");
    stringBuilder1.append(str2);
    Log.d("H@ckademy - MainActivity", stringBuilder1.toString());
    if (!Objects.equals(str2, "25393f33080c563b242200422f276327293616442c353a0e211c6c2f443e1e38035900474c3d")) {
      byte[] arrayOfByte;
      try {
        MessageDigest messageDigest = MessageDigest.getInstance("SHA-512");
        messageDigest.update(str1.getBytes());
        arrayOfByte = messageDigest.digest();
      } catch (NoSuchAlgorithmException noSuchAlgorithmException) {
        noSuchAlgorithmException.printStackTrace();
        arrayOfByte = new byte[0];
      }
      if (check2(str1, arrayOfByte)) {
        Toast.makeText(getApplicationContext(), "Congratulations! You've found the flag!", 1).show();
        Log.d("H@ckademy - MainActivity", "success! Congratulations! You've found the flag!");
        return;
      }
      Toast.makeText(getApplicationContext(), "Incorrect flag!", 1).show();
      Log.wtf("H@ckademy - MainActivity", "error! Incorrect flag!");
      return;
    }
    Toast.makeText(getApplicationContext(), "Congratulations! You've found the flag!", 1).show();
    Log.d("H@ckademy - MainActivity", "success! Congratulations! You've found the flag!");
  }

  public void onCreate(Bundle paramBundle) {
    super.onCreate(paramBundle);
    setContentView(2131427356);
  }
}
Code Analysis
The text provided in the input is assigned to the variable ( str1 ), and then converted into a byte array called ( arrayOfByte2 ). Right after this conversion, a XOR operation is performed with an unknown key, and the result of this operation is assigned to the variable ( str2 ). If this variable contains the following HEX value:
25393f33080c563b242200422f276327293616442c353a0e211c6c2f443e1e38035900474c3d
the message "Congratulations! You've found the flag." is displayed. But how can we know what string after the XOR operation with an unknown key will give us such a result? We'll deal with this in the following steps.
Known Initialization Vector
Since the XOR operation is fully reversible, as I mentioned in a previous post, having 2 of the 3 variables allows us to easily calculate the last component. According to the formula:
$$ \text{Known_vector} \oplus \text{unknown_key} = \text{resulting_bytes} $$
By knowing the result and the provided vector, we can reconstruct the key by reversing the XOR input parameters:
$$ \text{Known_vector} \oplus \text{resulting_bytes} = \text{unknown_key} $$
Oh, the name "unknown key" may no longer be relevant, because it is now known :)
Alright, but how can we figure out the result of the XOR operation? For this, we will need to use the mobile application debugger Frida.
Installing and Configuring the Debugger
We should start by enabling the "Android Debug Bridge" option in the Blue Stack emulator.

Next, we check in the terminal whether everything is working correctly and whether the Windows system "sees" the emulator:

The next step is to define the architecture, which will be important when selecting the appropriate version of Frida. This can be done using the following commands:

getprop ro.product.cpu.abi
NOTE: Pay attention to the fact that this command is executed in the context of the emulator's shell, not the system shell!
Frida can be downloaded from this site, taking into account the appropriate version.
The next step is to place the Frida server in the emulator. This will be done using the command below:

adb -s localhost:5555 push frida-server /data/local/tmp
Note: You need to execute the command from within the directory containing the frida-server, otherwise, you must provide its absolute path!
The last step before launching the debugger is to gain root privileges, because without them, we won't be able to place hooks on the appropriate functions in the application. To do this, check the root checkbox in the Blue Stacks settings.

After this step, it's a good idea to reset the emulator, and after launching it, connect via adb and start the Frida server using the commands shown in the screenshot below:
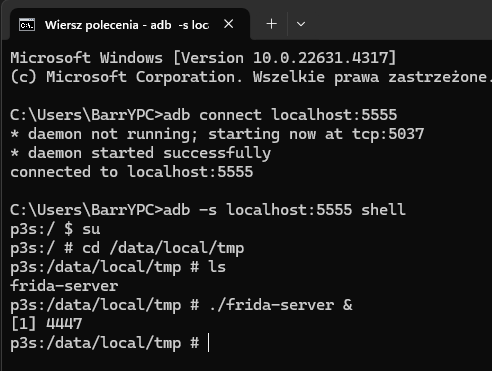
If the console shows the PID number of the running debugger process, we can consider this a success and return to the Windows system.
We still need to write a hook that will perform some action when the function it is placed on is called. Sample codes can be found on Frida's documentation page, and below I provide a script I modified to read and display on-screen the arguments passed to the equals function. In our case, these are the two compared hexadecimal strings.
Java.perform(() => {
    const Objects = Java.use('java.util.Objects');
    Objects.equals.overload('java.lang.Object', 'java.lang.Object').implementation = function(obj1, obj2) {
        console.log("Objects.equals called!");
        console.log("First argument: " + obj1);
        console.log("Second argument: " + obj2);

        if (obj1 && obj1.toString) {
            console.log("First argument as string: " + obj1.toString());
        }
        if (obj2 && obj2.toString) {
            console.log("Second argument as string: " + obj2.toString());
        }

        const result = this.equals(obj1, obj2);
        console.log("Comparison result: " + result);
        return result;
    };
});
We execute the connection to the debugger server with the command:
frida -U "Process_name" -l script-name.js
It’s a good idea to add Frida and the folder containing the scripts to the environment variables, to avoid providing absolute paths each time.
If everything works correctly, we should see a screen similar to the one where Frida waits for the execution of the function on which we placed the hook.
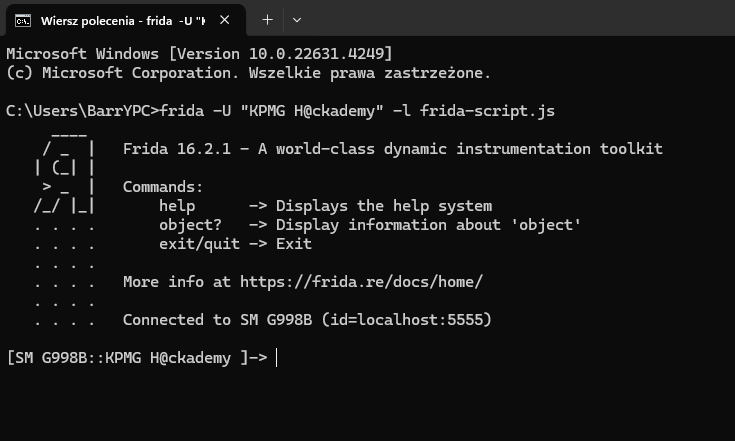
What's next?
Now that we have the environment set up, we need to provide some known_vector and see what the debugger shows us. What’s important is that it must be the same length as the string it is compared to.
The same length, so how much is it exactly?
The string: \( 25393f33080c563b242200422f276327293616442c353a0e211c6c2f443e1e38035900474c3d \) consists of 76 characters, or 38 bytes, because each ASCII hex value is made up of 2 hex digits. So, in the application input, we provide a sample known string:
'aaaaaaaaaaaaaaaaaaaaaaaaaaaaaaaaaaaaaa' //38 * 'a'
Let’s see what the console shows as the result:

We have the following value:
0f0813151221040c000f3e1111004e060f0813151221040c000f3e1111004e060f0813151221
Now, returning to our earlier considerations, we should perform a XOR operation on these two strings to recover the key.
I did this with the following script:
def xor_arrays(array_of_byte1, array_of_byte2)
  array_of_byte2.each_index do |b|
    array_of_byte2[array_of_byte2.length - b - 1] ^= array_of_byte1[b % array_of_byte1.length]
  end
  array_of_byte2.map { |byte| byte.to_s(16).rjust(2, '0') }.join
end

# It's 38 bits in hex, therefore I will declare the same length
my_string = 'a' * 38
my_string = my_string.bytes # convert to bytes

# Xored string I've got
xored_string = "0f0813151221040c000f3e1111004e060f0813151221040c000f3e1111004e060f0813151221"
byte_array = [xored_string].pack('H*').unpack('C*') # convert to bytes

# To get the key, we need to xor it again with our original value 38 * 'a'.
key = xor_arrays(my_string, byte_array)

# We got the key here
puts [key].pack('H*').reverse
This gives us the key value:
@string/app_name@string/app_name@strin
The XOR function used in the application repeats the key if the length of the provided strings exceeds the key's length, as implemented by a modulo division. This is indicated by the following code snippet:
arrayOfByte1[b % arrayOfByte1.length]
This tells us that if the key repeats, we can shorten it to its first occurrence, and therefore the key we are looking for is:
@string/app_name
Recovering the flag value
Now, we need to perform a XOR operation on the two obtained strings. Below is the code that allows us to do this:
def xor_arrays(array_of_byte1, array_of_byte2)
  array_of_byte2.each_index do |b|
    array_of_byte2[array_of_byte2.length - b - 1] ^= array_of_byte1[b % array_of_byte1.length]
  end
  array_of_byte2.map { |byte| byte.to_s(16).rjust(2, '0') }.join
end

key = "@string/app_name".bytes

encrypted_string = "25393f33080c563b242200422f276327293616442c353a0e211c6c2f443e1e38035900474c3d" # It's in hex
byte_array2 = [encrypted_string].pack('H*').unpack('C*') # convert to bytes

out = xor_arrays(key, byte_array2)
puts [out].pack('H*')
And here is the result of the code:
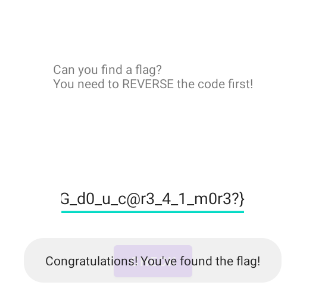
KPMG{L3VEL_2_FL@G_d0_u_c@r3_4_1_m0r3?}
That’s another flag! And its text says that we still have more to find. We can verify its validity in the application and compare it in the debugger:

Where's the next one?
Let’s return to the decompiled onCheck function. There’s one more condition leading to information about finding the flag. The check2 function must return true. It seems that it is passed the values str1, which is the text provided in the input, and arrayOfByte, which contains the SHA-512 hash!? Hmm, cracking that might not fall under the medium category of tasks, if it’s even possible at all. This doesn’t seem like the path we should follow. But what is the check2 function exactly? I can’t find its implementation anywhere in the program, and the only line referencing it is:
public native boolean check2(String paramString, byte[] paramArrayOfbyte);
Which doesn’t tell us much, but right before it, there is a library loading with the name ".c"!?
  static {
    System.loadLibrary("c.");
  }
Strange things. In that case, we need to approach this differently. Let’s extract all possible files from this application. In the exported files, in the lib directory, there is indeed a file named "libc..so". Heh, the double period is a clever trick by the creators of this puzzle. Since this library is written in C, we need to use a different tool for decompiling it.
Welcome to Ghidra
Ghidra is a great tool developed and released by the NSA, yes - the NSA.
After running it in this program and decompiling the "libc..so" file, we found the check2 function inside! That’s great, now we can see what exactly is being checked there.
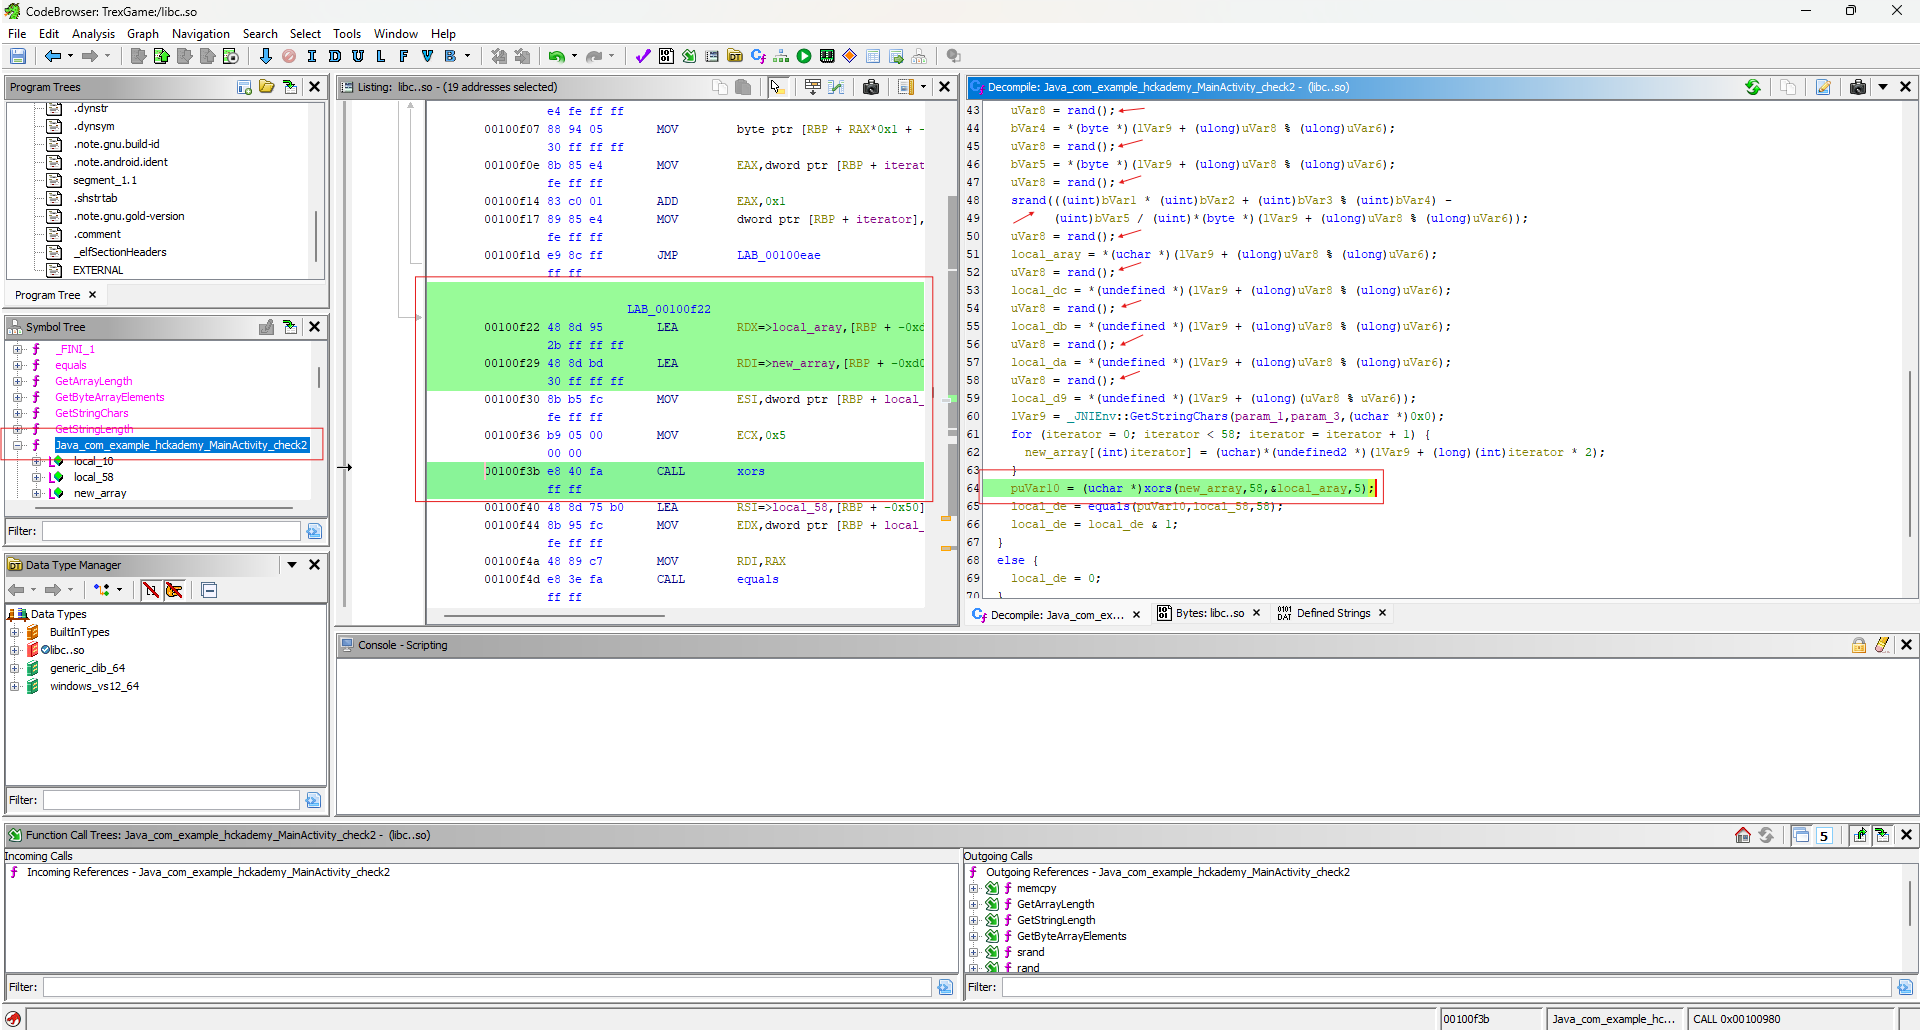
Hmm, it doesn’t look too good, a lot of random values are being generated inside. In some types of challenges, it is possible to break part of the randomness, but probably not with so many variables. Let’s read further. It’s clear that a XOR operation is performed below, but with some custom implementation. Let’s open it and see what's inside.
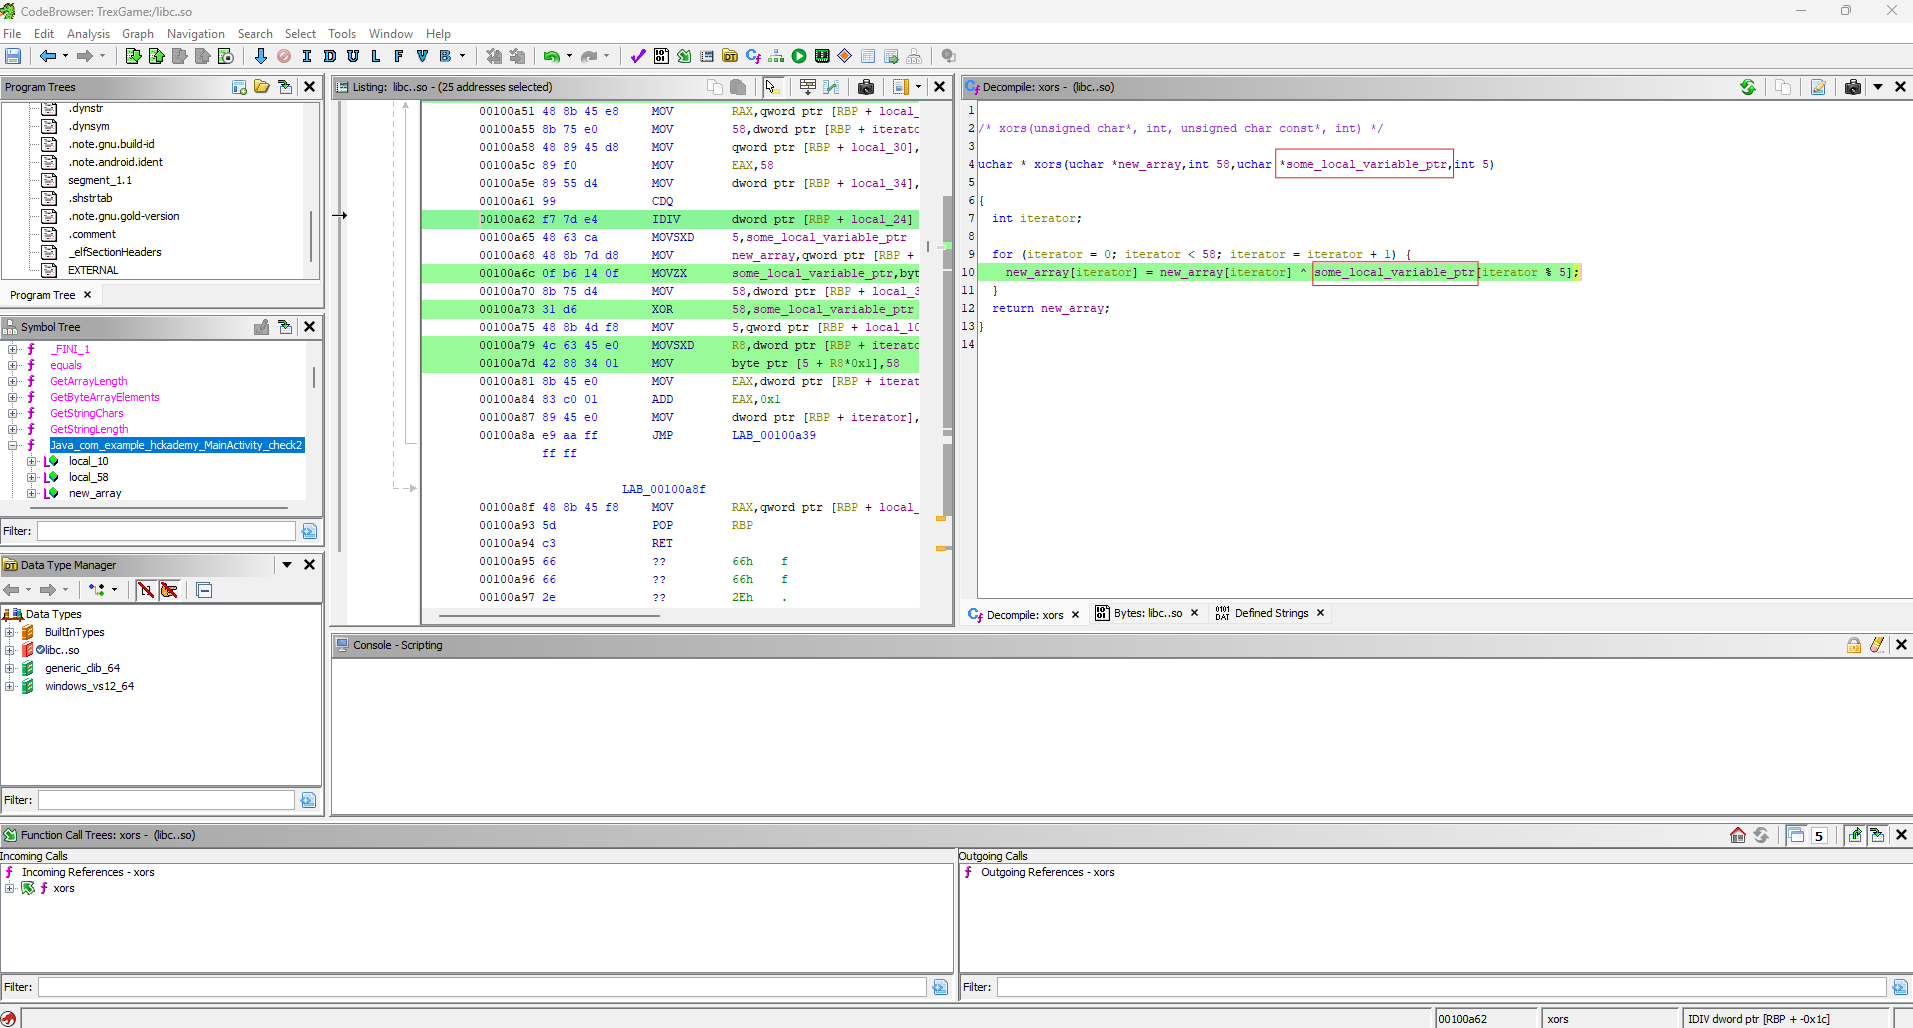
This function performs a XOR operation with modulo 5, which suggests the key length - in the previous example, it was similarly “arrayOfByte1.length”. That’s good news; we could attempt a brute-force attack, but 5 bytes is still not that small, so let’s leave that as a last resort.
We are still missing one more piece of information: the XOR operation is performed on the string that we provide to the application, and the key is generated from random values. Well, this doesn’t tell us much. Fortunately, a line below, we see the equals function, which compares these strings.
local_de = equals(puVar10, local58, 58);
local_de = local_de & 1;
It looks like it’s checking whether the value returned by this function is 1, meaning it’s comparing the strings passed to it. Ah, yes, it must be comparing them to some predefined value... Let’s rename the parameters and check where they are located. The value local58, which I renamed referred_array, only appears in one place in the code, and a pointer to an array located at &DAT_00101080 is copied to it, and 58 bytes are copied. Interestingly, the number 58 is also passed to the equals function, which suggests that this is the length of the string array. So, let's see what’s inside.
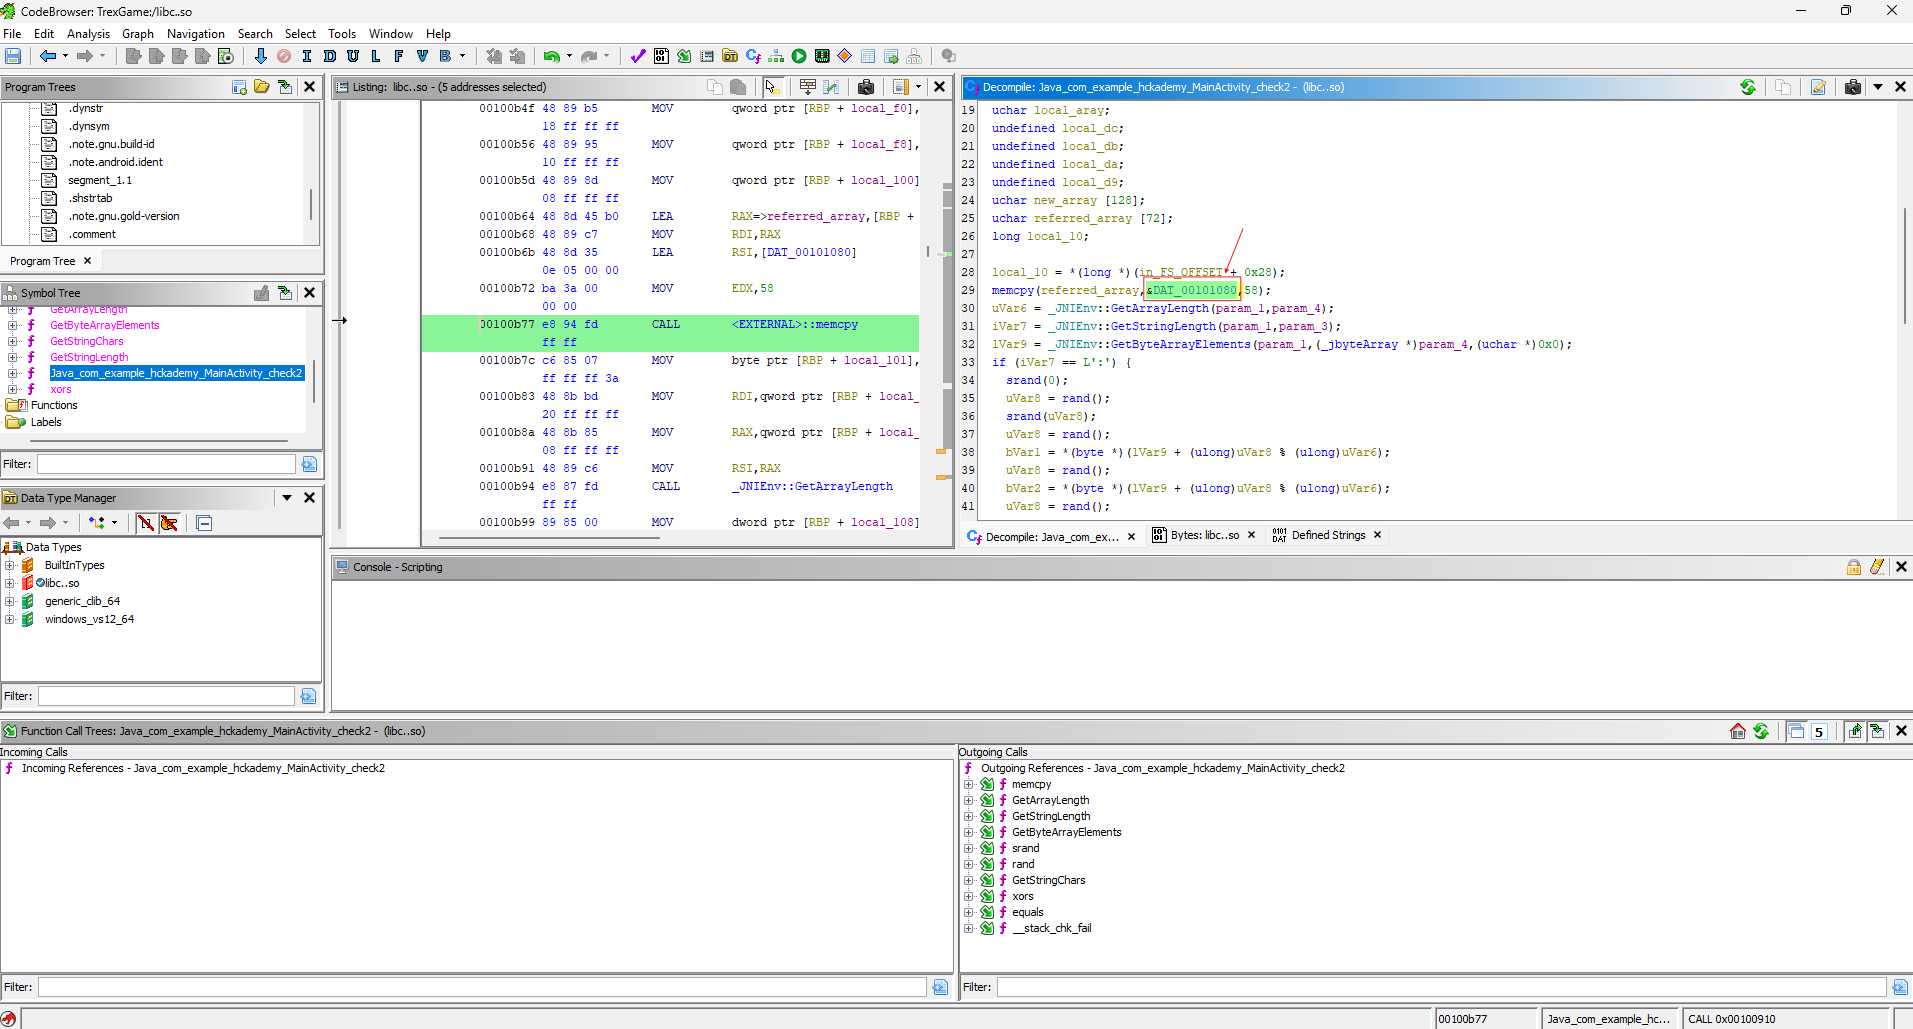
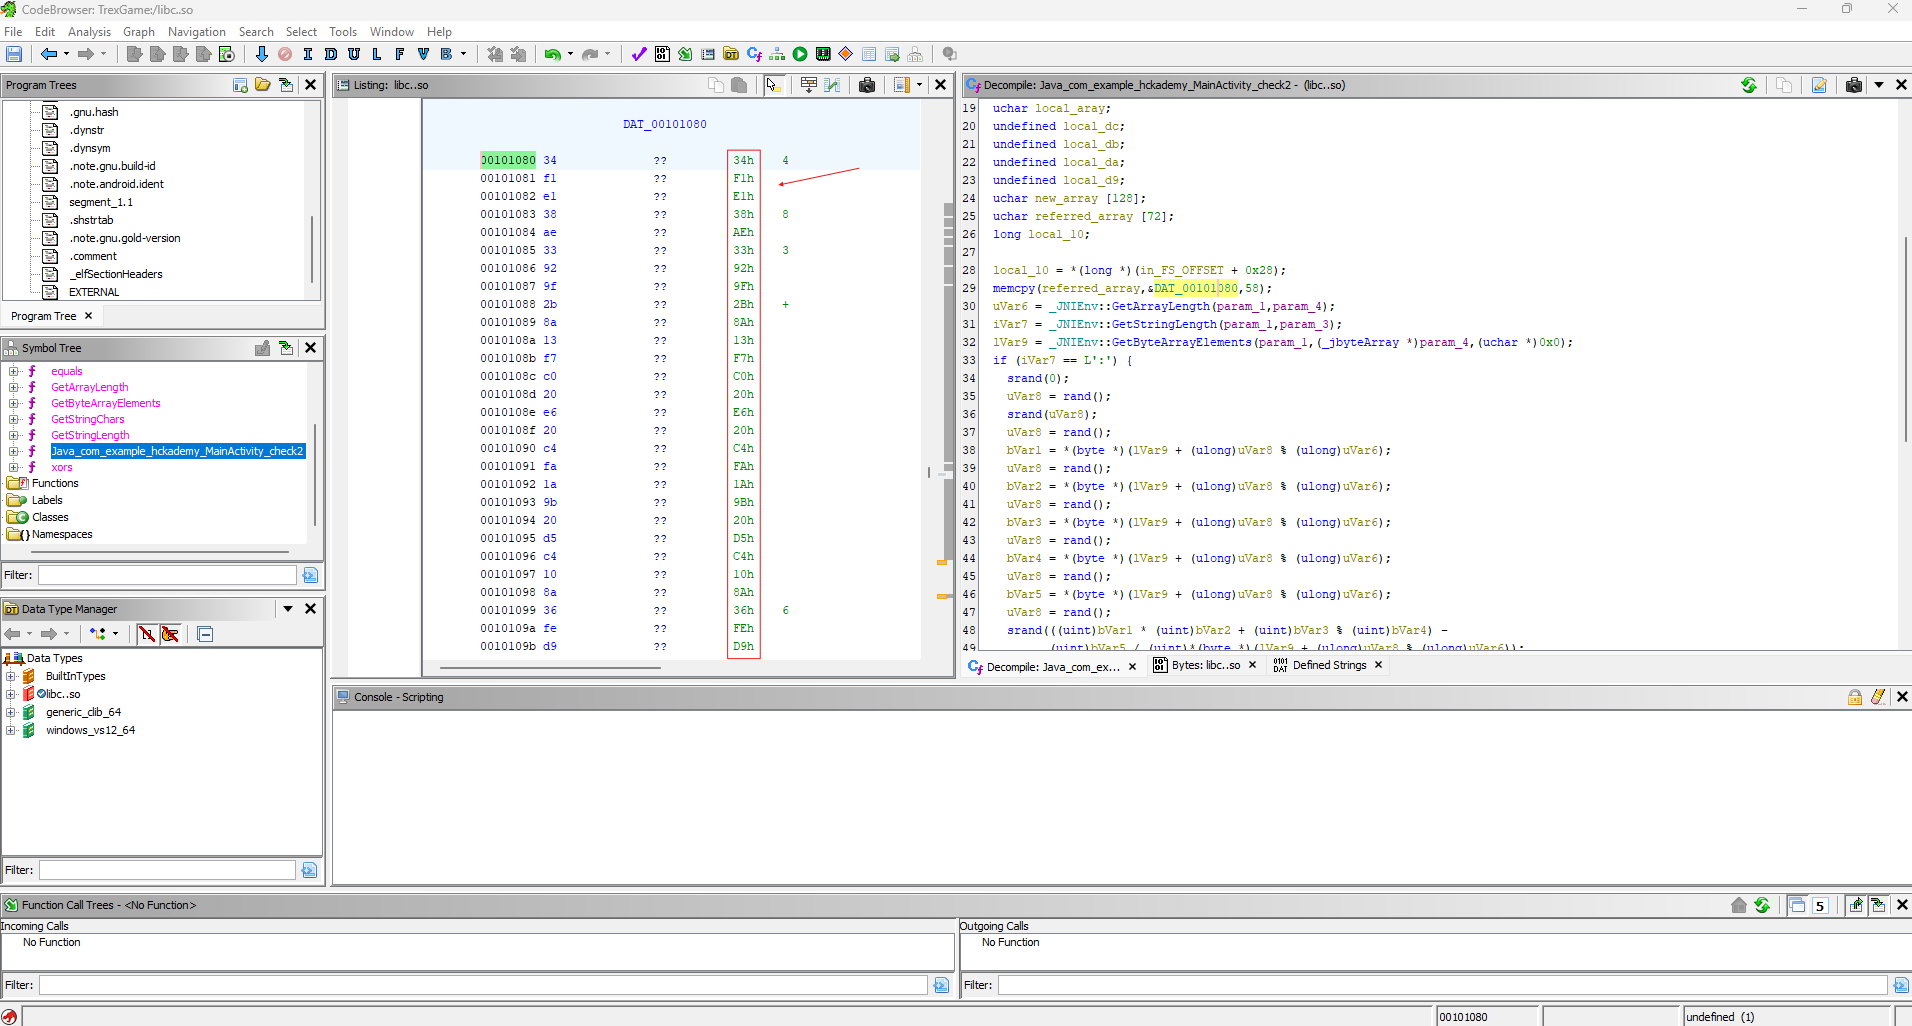
We can immediately highlight and copy the entire array:
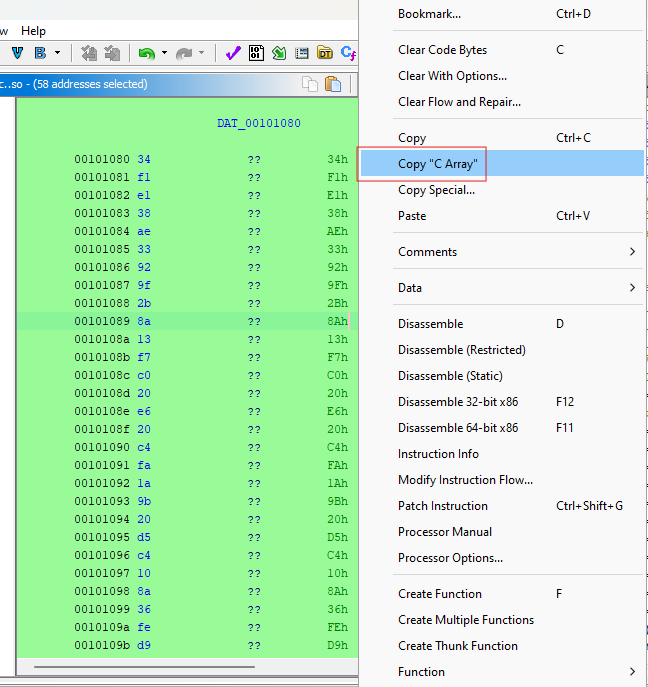
Its value is:
[0x34, 0xf1, 0xe1, 0x38, 0xae, 0x33, 0x92, 0x9f, 0x2b, 0x8a, 0x13, 0xf7, 0xc0, 0x20, 0xe6, 0x20, 0xc4, 0xfa, 0x1a, 0x9b, 0x20, 0xd5, 0xc4, 0x10, 0x8a, 0x36, 0xfe, 0xd9, 0x0c, 0xe6, 0x1b, 0xfe, 0xde, 0x3f, 0xbb, 0x1b, 0xce, 0xc1, 0x20, 0xf2, 0x11, 0x86, 0xf3, 0x0c, 0xb0, 0x1c, 0xf4, 0xde, 0x1a, 0x8a, 0x17, 0xe1, 0xdf, 0x17, 0xea, 0x40, 0x9e, 0xd1]
So, we have the array, and we know it’s being compared to a string that has been XORed with a five-byte key. This would suggest that the array was created in the same way! Thus, we can assume the equation is valid:
$$ \text{some_text} \oplus \text{5byte_key} = \text{byte_array} $$
But this time, we only have one component. However, we can assume that we want to get a string that starts with the characters "KPMG{", which is exactly 5 bytes long!
Attempt to recover the string from libc..
Let’s perform the XOR operation on the first 5 bytes of this array with the string "KPMG{".
def xor_arrays(xor_key, array_to_be_xored)
  array_to_be_xored.each_index do |b|
    array_to_be_xored[b] ^= xor_key[b % xor_key.length]
  end
  array_to_be_xored.map { |byte| byte.to_s(16).rjust(2, '0') }.join
end

referred_array = [0x34, 0xf1, 0xe1, 0x38, 0xae, 0x33, 0x92, 0x9f, 0x2b, 0x8a, 0x13, 0xf7, 0xc0, 0x20, 0xe6, 0x20, 0xc4, 0xfa, 0x1a, 0x9b, 0x20, 0xd5, 0xc4, 0x10, 0x8a, 0x36, 0xfe, 0xd9, 0x0c, 0xe6, 0x1b, 0xfe, 0xde, 0x3f, 0xbb, 0x1b, 0xce, 0xc1, 0x20, 0xf2, 0x11, 0x86, 0xf3, 0x0c, 0xb0, 0x1c, 0xf4, 0xde, 0x1a, 0x8a, 0x17, 0xe1, 0xdf, 0x17, 0xea, 0x40, 0x9e, 0xd1]

known_array = "KPMG{".bytes

key = xor_arrays(known_array, referred_array[0..4])
key = [key].pack('H*').unpack('C*')

puts "================ Key = #{key.map { |byte| byte.to_s(16).rjust(2, '0') }.join} ============="
This code returned the result:
================ Key = 7fa1ac7fd5 =============
Which means that now we can try to reconstruct the entire string. To do this, just add the following 2 lines to the end of the previous code:
str2 = xor_arrays(key, referred_array)
puts [str2].pack('H*')
The final result was:
================ Key = 7fa1ac7fd5 =============
KPMG{L33T_lVl_3_eVeN_tho_I_us3d_r@ndom_'n'_secUre_h@sh???}
This is the final flag, with a message that the "secure and random" hash has been cracked!
Summary
Throughout this analysis, we’ve explored the process of reverse engineering an application using various tools such as Ghidra and Frida. Starting with an initial examination of the application’s strings, we discovered the first flag before even running the program. From there, we decompiled the application to investigate its logic, focusing on XOR operations and custom implementations that manipulate input data.
By employing a step-by-step approach, we recovered keys through XOR operations, leveraged known initialization vectors, and bypassed the application's random elements to find hidden flags. Ghidra helped us trace how the key was derived and allowed us to analyze core functions such as check2. Meanwhile, Frida proved invaluable for debugging and intercepting critical points of comparison.
In the end, we managed to reveal multiple flags, including the final one, which humorously pointed out that even a "secure and random" hash can be cracked. This exercise not only demonstrated the strength of reverse engineering tools but also highlighted the ingenuity required to solve complex challenges through methodical investigation.
X
Comments (0)
Please log in to add a comment.